
Restoring a Selected Folder or File
Help
This video will show you how to use the ADSM Client for
Windows to restore a specific file or folder.
Please wait while the video file is downloaded to your
computer.
More Information
|
1. Click the plus symbol ( |
|
|
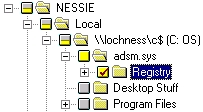
2. Make sure to click the checkbox next to the file or folder you want to restore. If it doesn't have this icon ( |
|
|
3. You restore a file by clicking the checkbox next to it. To see more information on how to locate a file on your hard drive, click here. |
|
|
4. If the folder or file is not in the first
list after you click the plus symbol ( |
|
|
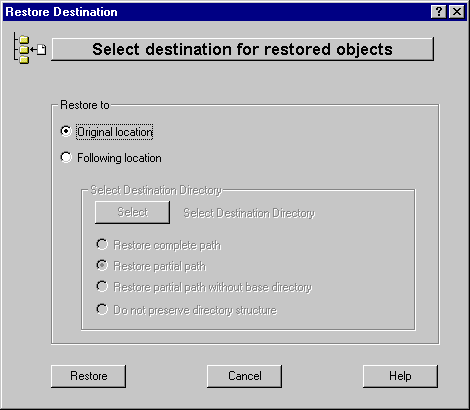
5. This dialog box allows you to specify where the restored file or folder will end up. The Original Location option will put the file or folder in its original location on the hard disk. For example, if the file was on the desktop originally, the restored file will be placed on the desktop.
|
|
|
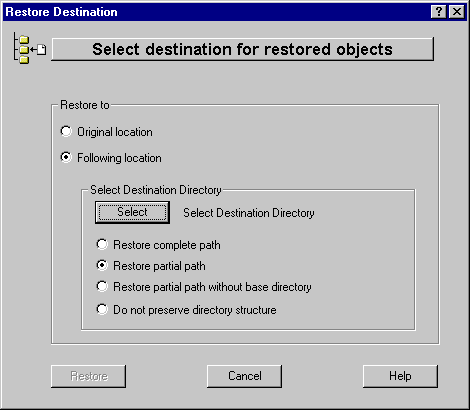
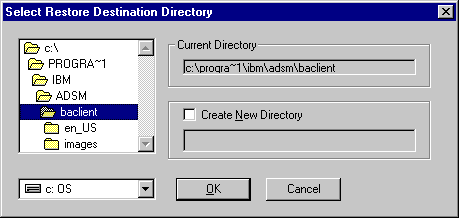
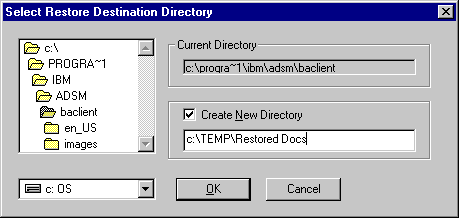
6. Click the Following Location option if you would like to save the restored file or folder in a different location. Click the Select button to specify where to save the restored file or folder. In the dialog that appears, you can navigate through you file structure on your hard drive. The listing on the left of the dialog box allows you to decide what folder to place the restored file or folder in. The pop-up menu below the listing allows you to switch the disk or disk partition you would like the restored file or folder on. The "Current Directory" box shows you what directory you are in using an MS-DOS like path view. Click the "Create New Directory" checkbox to create a new directory on your hard drive to store the restored folder or file in. When you click the checkbox, you specify the new directory to create by typing in the path that appears. In this example, the user typed in"c:\TEMP\Restored Docs" to have the ADSM Client save the restored file or folder into a Restored Docs directory in the Temp directory on the C drive. Locate and click the folder or disk you would like the restored file or folder in, then click the OK button. |
|
|
7. If you are restoring a file or folder that already exists, you will get an alert like this. Click Replace to replace the current file or folder with the restored one. Click Don't Replace to skip the restore of the duplicate file or folder. Click Cancel to terminate the entire restore operation. |
|
|
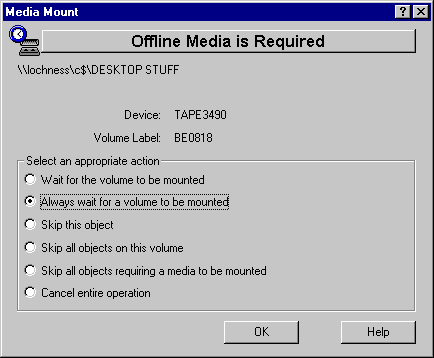
8. You may receive a Media Request dialog box telling you that a file or folder needs to be retrieved from off-line or tape media. In the list of options that is presented, click the "Always wait for volume to be mounted" option. Then, click the OK button. You choose the "Always wait for volume to be mounted" option so that you will only receive one Media Request dialog box. If you simply clicked OK, you may receive more than one dialog box and would have to click OK each time. |
|


Modified: February 9, 2000
Los Alamos National Laboratory
Operated by the University of California for the US Department of Energy
Copyright © UC 2000 | Disclaimer